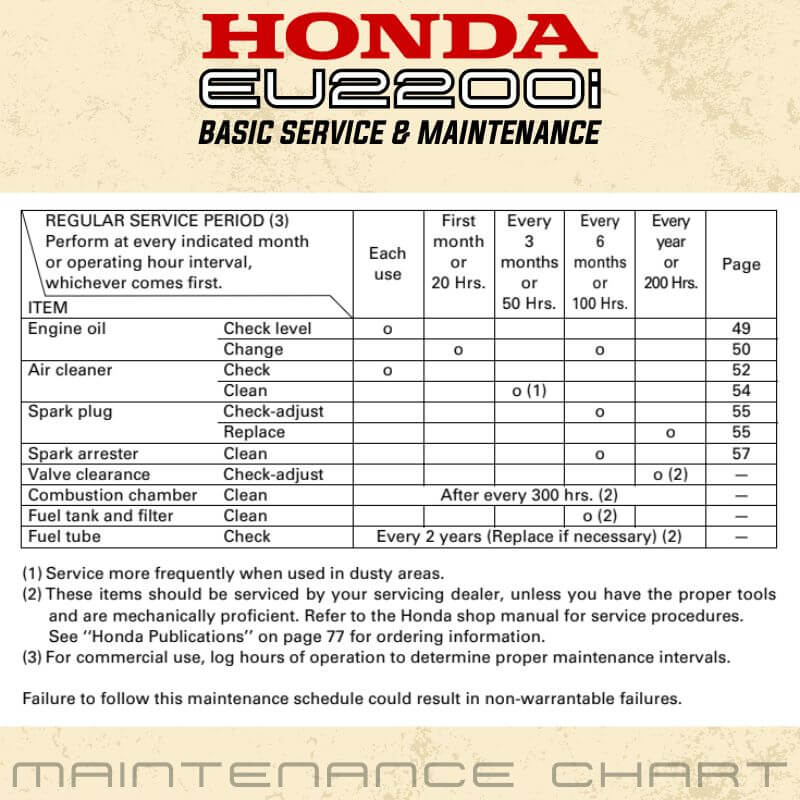
Maintaining your Honda EU2200i Portable Generator is not just a recommendation, it's the key to ensuring its longevity, safety, and peak performance. Afterall you've invested in the best, why not keep it for a long period of time? Plus, you play a vital role in reducing air pollution when you keep it in top shape. Dive into the guidelines we've provided to help you tend to your Honda EU2200i Portable Generator effortlessly, covering routine inspections and easy maintenance steps with your basic tools.
CRUCIAL SAFETY REMINDERS FOR YOUR PEACE OF MIND
Safety is paramount when performing maintenance, but we can't pinpoint every possible risk. Ultimately, your judgment determines whether you're equipped for a task.
Key Safety Tips:
Shut Off the Engine: Before diving into any maintenance or repairs, always ensure the engine is off. This simple step protects you from:
Carbon Monoxide Dangers: Ensure you operate outdoors and away from open windows or doors to prevent harmful exhaust inhalation.
Burn Hazards: Hot engine parts can cause severe burns. Always allow the engine and exhaust system time to cool before handling.
Moving Part Injuries: For your safety, don't run the engine unless the procedure explicitly asks you to.
Preparation Matters: Before starting, familiarize yourself with the instructions.
Ensure you're equipped with the necessary tools and understand the steps involved.
Fuel Safety: Gasoline poses fire and explosion risks. While working around it, exercise extreme caution. Instead of gasoline, use non-flammable solvents for cleaning components. Always keep sources of ignition, like cigarettes or open flames, away from fuel-related components.
HONDA EU2200i GENERATOR SMART REFUELING: SAFETY FIRST
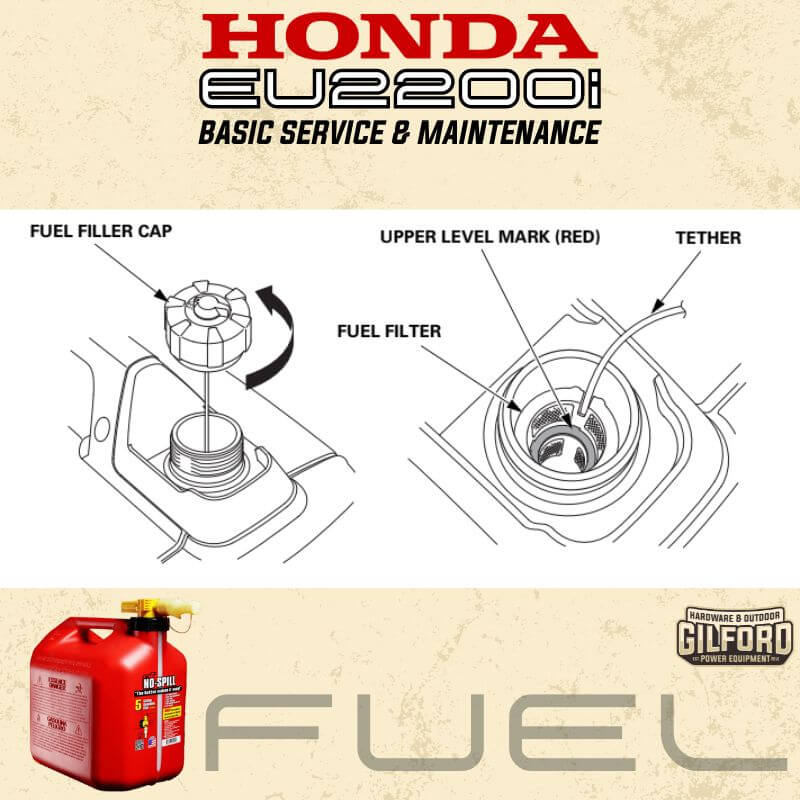
Before starting, ensure your engine is off. Then, carefully remove the fuel cap to inspect the fuel level, topping up as needed. Remember, fuel can tarnish paint and harm plastics. Exercise caution to avoid any spills during refueling, as any damage from fuel spills isn't covered under the Distributor's Limited Warranty.
Always refuel in open, well-ventilated spaces. If your engine has been active, wait for it to cool down before refueling. Be meticulous to prevent overfilling; the upper limit is indicated on the fuel filter.
It's crucial never to refuel indoors where gasoline vapors might encounter open flames or electrical sparks. Maintain a safe distance from devices like pilot lights, grills, and electrical equipment.Spilled fuel isn't just a fire risk; it's detrimental to our environment. In the event of a spill, act quickly to clean it up.
CHOOSING THE RIGHT FUEL: GUIDELINES FOR OPTIMAL PERFORMANCE
For this engine, stick with regular unleaded gasoline that boasts a pump octane rating of 86 or above. Here are some tips to ensure your fuel enhances your engine's lifespan:
Quality is Key: Always steer clear of stale or contaminated gasoline and never use any mixed with oil. A clean fuel tank is a happy one, so avoid letting dirt or water contaminate it.
Ethanol and Methanol Limits: Your engine can handle unleaded gasoline with up to 10% ethanol (E10) or 5% methanol. When using methanol, ensure it's combined with the necessary cosolvents and corrosion inhibitors.
Stay Within Limits: Using fuels that exceed the mentioned ethanol or methanol percentages can lead to difficulties in starting, performance glitches, and potential damage to the fuel system's various components, including metal, rubber, and plastic parts.
Warranty Information: Just a heads up, any engine damages or performance issues stemming from using fuel with higher ethanol or methanol content than recommended are not protected under the warranty. Choose wisely!
HONDA EU2200i PORTABLE GENERATOR MONITORING YOUR ENGINE OIL: STEP-BY-STEP GUIDE
Checking the Oil Level:
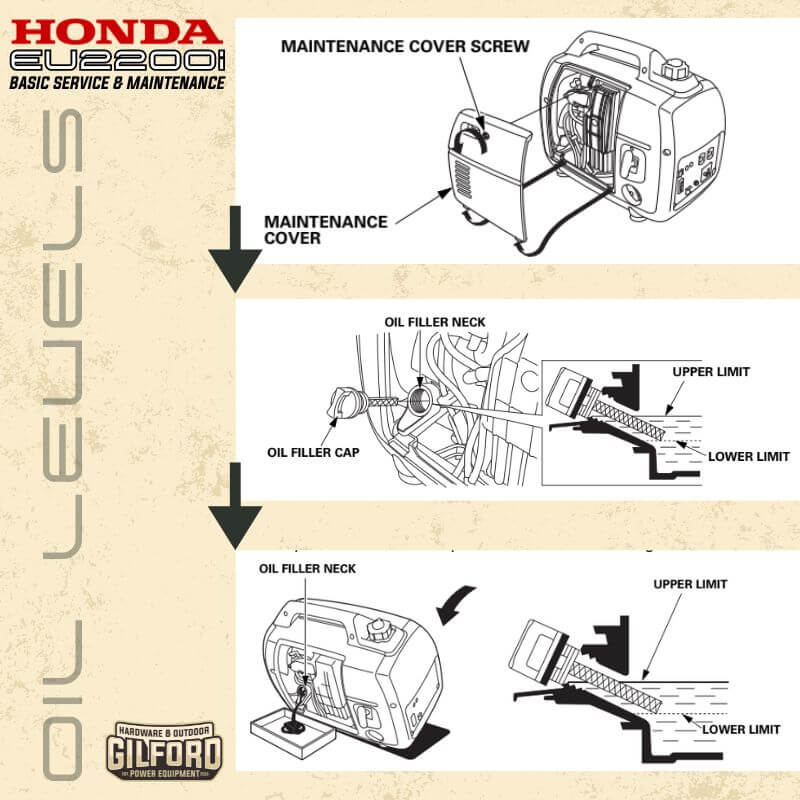
- Ensure the generator is on a flat surface with the engine off.
- Open the maintenance cover by loosening its screw.
- Unscrew the oil filler cap and clean off the dipstick.
- Insert the dipstick into the oil filler neck without screwing it back in to check the oil level.If it's below the mark, top it up with the recommended oil (refer to page 51) until it reaches the upper limit of the filler neck.
- Screw the oil filler cap back on securely.
- Replace the maintenance cover and tighten its screw.
A nifty feature to note: The Oil Alert system will halt the engine before the oil level drops to unsafe levels. Yet, to prevent any unforeseen stops, consistently check the oil level.
HONDA EU2200 PORTABLE GENERATOR CHANGING THE ENGINE OIL
- For a thorough drain, ensure the engine is warm.
- Switch the engine and fuel cap vent lever to OFF (see page 28) to minimize fuel leakage.
- Access the engine by loosening the maintenance cover screw and taking off the cover (refer to page 49).
- Prepare a container beside the engine to collect old oil.
- Unscrew the oil filler cap, and by tilting the engine towards the oil filler neck, drain the oil into the container.
- Remember: Proper disposal of used engine oil is crucial for the environment. When changing the oil yourself, seal the used oil in a container and take it to a recycling facility. It's not for the bin, ground, or drain.
- Level the engine and refill it using the recommended oil (details on page 51) up to the filler neck's upper limit. Note: The maximum oil capacity stands at 14 oz (0.44 L).
- Securely fasten the oil filler cap.
- Replace and secure the maintenance cover.
A gentle reminder: Always cleanse your hands after handling used engine oil.
GUIDE TO CHOOSING THE RIGHT ENGINE OIL FOR THE HONDA EU2200i GENERATOR
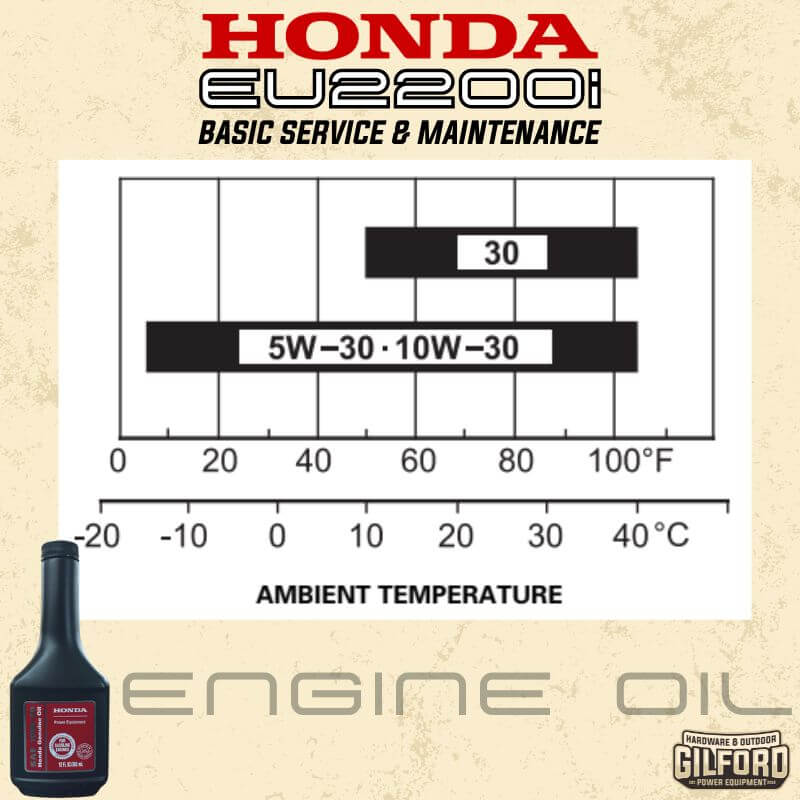
The right oil can significantly influence your engine's performance and longevity. Opt for a 4-stroke automotive detergent oil for optimal results.
For most scenarios, SAE 10W–30 is the go-to choice. However, depending on the average temperatures in your region, other viscosities listed in the chart can be used.
When picking your oil, glance at the API label on the container. It provides insights into the SAE oil viscosity and service category. For the best outcome, stick with oils that are API service category SJ or later, or their equivalents, as recommended by Honda.
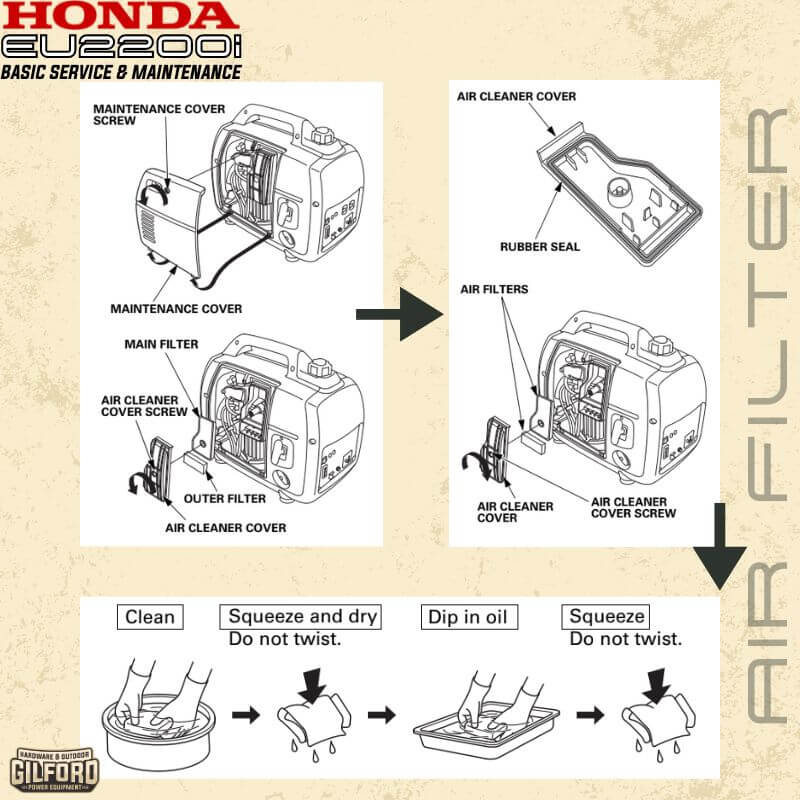
Steps to Service Your Air Cleaner:
- Begin by loosening the maintenance cover screw to take off the maintenance cover.
- Proceed to the air cleaner cover. Loosen its screw and remove the cover.
- Extract both the main and outer filters from the air cleaner's housing.
- Examine the main and outer filters for cleanliness and integrity. Should they be dirty, refer to the cleaning instructions on page 54. Replace any damaged filters.
- Once checked or cleaned, place the air filters back in their positions.
- Ensure the rubber seal snugly fits into the groove of the air cleaner cover.
- Reattach the air cleaner cover and securely fasten its screw.
- Put back the maintenance cover and tighten its screw for a snug fit.
GUIDE TO CLEANING MAIN AND OUTER AIR FILTERS ON THE HONDA EU2200i PORTABLE GENERATOR
Ensuring that your air filters remain clean is pivotal for optimal engine performance. When dust accumulates, it can hinder air flow to the carburetor, thus affecting the engine's efficiency. If your generator operates in notably dusty environments, consider cleaning the filters more often than the general maintenance timeline suggests.
Steps to Clean Your Air Filters:
- Immerse the air filters in warm, soapy water. After a thorough wash, rinse them off and let them dry completely. Alternatively, you can also cleanse them using a nonflammable solvent and let them dry.
- Once dried, immerse the filters in clean engine oil. Ensure you squeeze out any excess oil post this. Over-saturation with oil can cause the engine to emit smoke upon ignition.
- With a damp cloth, wipe away any dirt present on the air cleaner housing and its cover. While doing so, take care to avoid any dirt from getting into the air duct leading to the carburetor.
STEP-BY-STEP GUIDE TO SERVICE THE SPARK PLUG ON A HONDA EU2200i PORTABLE GENERATOR
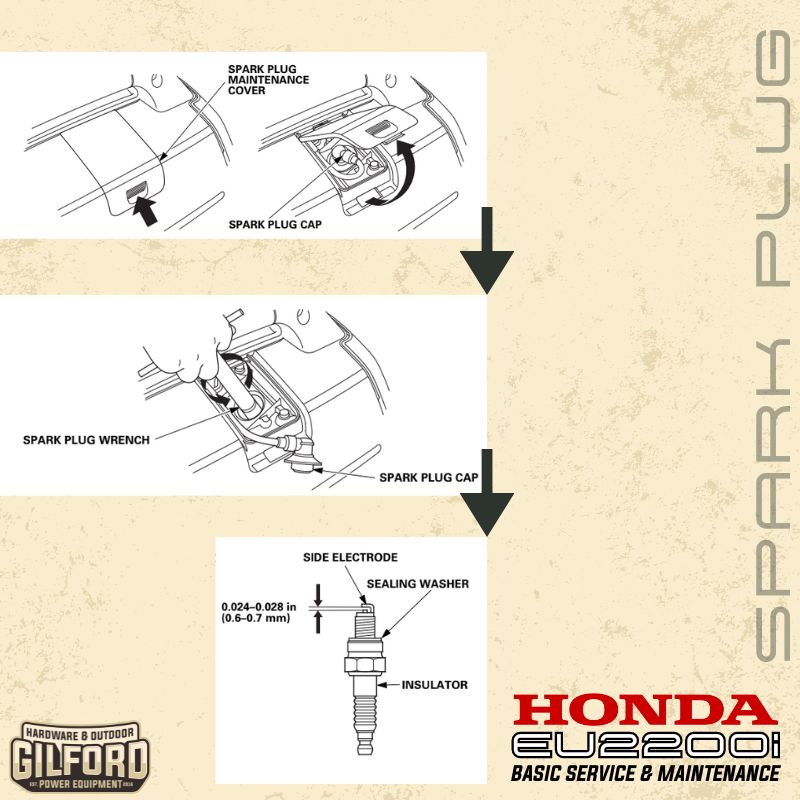
Maintaining a well-functioning spark plug is paramount for optimal engine performance. For this procedure, equip yourself with a commercially available spark plug wrench. Ensure that the spark plug (CR5HSB by NGK) has the appropriate gap and remains free from unwanted deposits.
- Begin by removing the spark plug maintenance cover.
- Detach the spark plug cap.
- Clear any accumulated dirt around the spark plug base.
- Using your spark plug wrench, proceed to unscrew and remove the spark plug.
- Examine the spark plug carefully. Look out for worn electrodes or any damage to the insulator, such as cracks, chips, or fouling. If any of these are present, replace the plug.
- Use a wire-type feeler gauge to measure the gap between the spark plug electrodes. If needed, gently adjust the side electrode to achieve the recommended gap of 0.024–0.028 in (0.6–0.7 mm).
- Prior to reinstallation, check the spark plug sealing washer for any wear or damage. Begin threading the spark plug by hand, ensuring you don’t cross-thread.
Once the spark plug sits in its position, use the spark plug wrench to secure it further:
- For a previously used spark plug: Tighten it an additional 1/8–1/4 turn.
- For a new spark plug: Tighten it an extra 1/2 turn.
- Recommended torque is 8.7 lbf·ft (12 N·m, 1.2 kgf·m).
- Note: An inadequately tightened spark plug can cause overheating, thereby harming the engine. Conversely, excessively tightening the plug risks damaging the cylinder head's threads.
- Ensure the spark plug cap is securely reattached.
- Finally, place the spark plug maintenance cover back in its position.
- Your spark plug is now serviced and ready for optimal performance.
Caution: Operating your engine without the air filters or with faulty ones exposes it to dirt. This can accelerate engine wear, and any damage stemming from this negligence isn't covered by the Distributor’s Limited Warranty. Always prioritize proper maintenance!


